ℹ️ The ingestion methods available vary based on the LinkSquares products and services purchased by you. For a list of supported third-party cloud-based storage application ingestion methods available for your account, reach out to your Account Team.
Overview
LinkSquares Analyze integrates with several existing systems to automatically ingest contracts and increase your team's efficiency. Analyze currently integrates with Box, Dropbox, Google Drive, SharePoint, Egnyte, and more.
Since users can only authorize their default document library, the user authorizing the sync between LinkSquares and SharePoint should be the SharePoint Global Administrator.
Note: The SharePoint integration supports pulling in agreements via inbound syncs.
Process
Step 1: Getting Started
Set up your SharePoint/LinkSquares group instance in Azure/Entra.
To set up your SharePoint integration, you need to register this app with your SharePoint account. To learn more about registering with your SharePoint account, reference this web page on How to connect to SharePoint on Workato.
You will be required to input a Redirect URL. Input the following:
https://www.workato.com/oauth/callback
- Once you set up your API keys, you will get the Client ID and Client Secret.
- The SharePoint subdomain name will be found in the SharePoint URL
You will need the following API permissions in the Azure portal:
Once your SharePoint/Azure is set up reach out to your Implementation Consultant or Support Team
Onboarding: Implementation Consultant
Post Onboarding: support@linksquares.com
They will send an email to the SharePoint Administrator to implement.
Note:
- For optimal results, use the Chrome browser.
- Cookies must be enabled
Once the email is received:
Click on the CLICK TO AUTHORIZE ACCESS button.
This will open a new browser tab.
Step 2: Service Selection
Within the new tab, click the Select Folder button.
You will be prompted to select the service that you wish to sync with.
Click Authorize to select SharePoint from the list of services.
Step 3: Authorization
A pop-up window will require you to authorize your SharePoint account.
If this does not occur, check if your pop-up blocker is disabled for app.linksquares.com.
Note:
- For SharePoint, the user will require Admin credentials to set up the sync.
- Authentication type = Authorization code grant
-
Client Secret: shared with us will expire and is subject to vary based on the organization’s security policies.
- Note: The Value should be used and not the ID
- Client ID: Contained within the LinkSquares group in SharePoint. Client ID = Application ID
-
Site Name: The name of the SharePoint site to which you plan to connect in the Site name field. Use the site name as found in the URL of the site page.
For example: The URL ishttps://company-name.sharepoint.com/sites/product
The site name =product
Step 4: Select a Time Zone
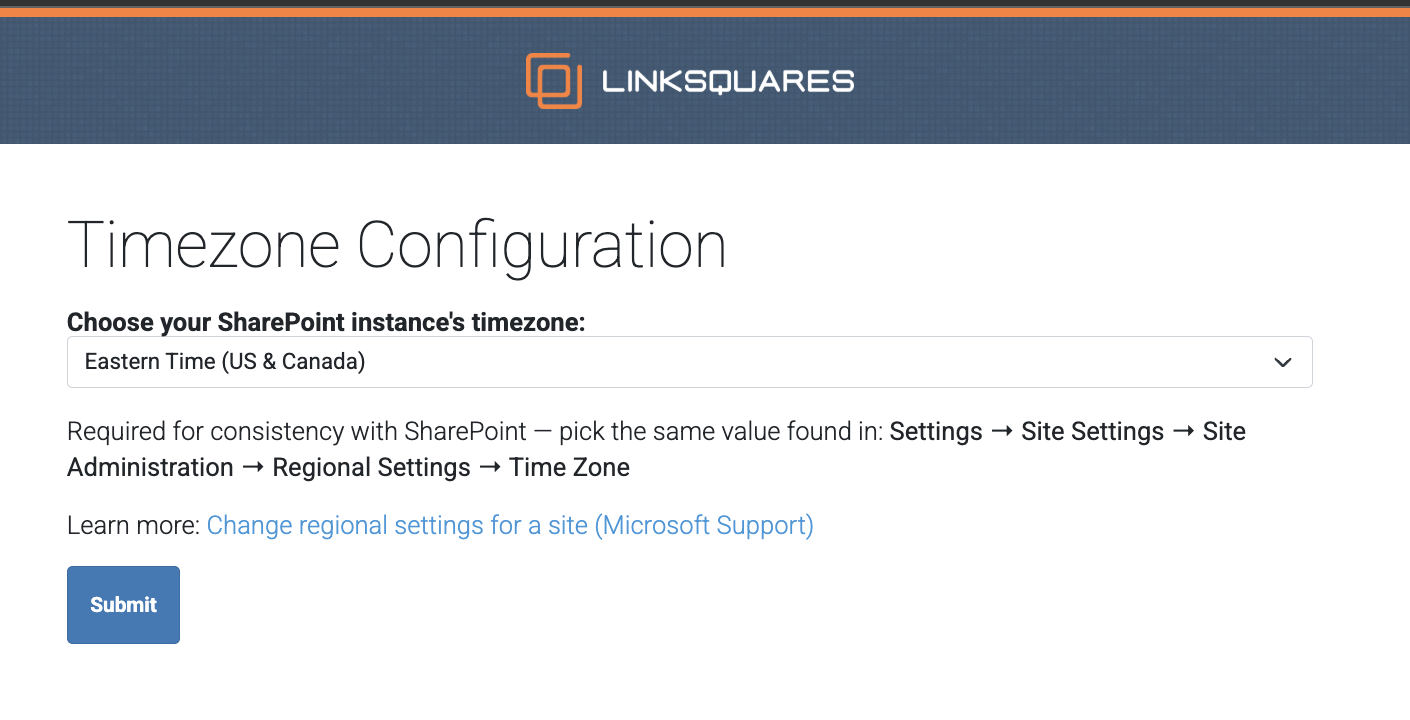
Selecting a time zone is required. For more information regarding time zone selection: HERE
Step 5: Select a Folder
The final step to configuring the SharePoint integration is selecting the folder you wish to sync from. If you want to select a nested folder, click on the home folder and choose to See Contents.
Folder Authorization Requirements
Users can only authorize their default document library which is called Documents.
After clicking on the folder, click Sync with the Folder.
You will see an Authorization Pending page. After a few moments, refresh your browser.
Your sync is complete when you see an Authorization Successful page.
Step 6: Upload
Once the SharePoint integration is fully configured, LinkSquares will begin transferring files from SharePoint to your LinkSquares account. This can be set to continuous ingestion of files.
Note: If the person who established the sync leaves the organization, the sync between your existing repository and LinkSquares will be broken. Contact support@linksquares.com to re-establish the sync.
Due to limitations of the Sharepoint API, the maximum total document count of 5K in the synced folder will successfully sync over.
Surpassing this document amount in the folder, results in the sync breaking.
NOTE: If you are reestablishing a sync that was prior broken, any existing agreements will need to be removed from the folder prior to the sync and then placed back in. This will ensure that the sync will pick up ALL agreements in the folder.